
Topic Index
|
HOW TO START LITHOPS SEEDS:Lithops are surprizingly easy and fun to start from seed. Here is everything you need to know to grow them through their first year. The first set of true leaves that emerge from the cotyledons illustrate the potential for color, pattern and texture in the mature plant. But it is the constant and slow progression of cyclical change that is most captivating. The leaf colors and textures change completely on the way to bud formation and flowering. Their diversity through macro photographs of most of the Lithops species at key stages, some cultivars, a few hybrids, and crosses with Dinteranthus can be viewed in another link, Strangeplants >> Photo Galleries >> Lithops Seedlings . You can get there by clicking here 
grown from Mesa Garden seed number MG1612.4 planted on 03/24/07, photographed 03/16/08 (358 days). Lucious spring colors appear with their second true leaves. When old leaves start to die, shrink and consolidate, colors often change quickly and can become spectacular, even if only for a day. This is one of my favorite to watch in the seedling stage. |
GROWING MEDIA GOALS:Yes, there are hidden objectives in the soil, and mine are these:
|
LITHOPS AND CONOPHYTUM SEED STARTING MIX:Every cook has a recipe, mine is below. I find this one suits the microclimate of a greenhouse in the hills of northern New Jersey and also Southern California. Adjust it to suit your conditions as well as available materials. Remember your goals and keep a consistant recipe and pot size so you can judge water content by weight. If you do decide to alter your mix composition, better keep a log of which plants use your different mixes so you can later assess correctly the effects of composition change.
I 'heat clean' these last two items and the fine sand before use by microwaving the moistened material in a plastic grocery bag for five minutes, waiting five more, mix; then repeating twice. This kills larvae and most seeds, but not beneficial molds. Becareful of the steam in the bag, and it will smell up the kitchen to non-plant people. Put all in a bucket, moisten, mix. I usually triple the above using a yogurt cup as a measure into a 5 gallon pail. You will know when the water is right - the mix will be consistant without separation. |
SEED STARTING MIX INGREDIENTS:
|
PREP THE POT:Use a small piece of fiberglass drywall tape (a medium open weave with adhesive) in the bottom of 3-1/2" or 4" square plastic short pots over the drain holes to retain mix for a packet of 20+ seeds; fill to about 3/4" from the rim. Level and flatten off, tamp gently with a bottle cap to level and ever-so-slightly compact. |
HOW TO SOW LITHOPS AND CONOPHYTUM SEEDS:Sow seeds on the seed starting surface, trying to spread them evenly - I use the corner of a Post-It Note folded diagonally to pick them up with the corner fold one by one from the palm of my left hand and drop them about where I want. Sprinkle a single layer of coarse sand or fine quartz filtration media using three fingers close to the surface. (The seeds pick up water quickly and will stick to the sand - even if it bounces. - they have a gelatinous coating. ) Seedlings will emerge and push the sand away - they need it for support to keep them from falling over. You might wonder why this happens, and it is because the seedling has one root, which elongates. Root hairs that would help to anchor many other plant species do not appear in Lithops until much later on. Some species are more prone to falling over than others, for example L. lesleii is more prone than L. aucampiae; L. jullii jullii fullerii much more so than L. lesleii; and there are variabilities by cultivar. Add coarse sand later as necessary to help prevent drying and dying of the single root, which can happen if the base of the seedling is above ground. |
WATERING SEEDLINGS:Water using a spray bottle, a small one of about 6 oz capacity, with a little Captan (fungicide) in it if you have it. Important! Cover with plastic wrap and a rubber band. Important! Place pot out of direct sun to germinate. Check moisture daily - remember the roots are very short at this stage, so they need a good supply of surface moisture. The presence of condensed water droplets on the plastic cover does not guarantee that the seedlings have sufficient moisture at their root level. You will have to spray often a few squirts. Take off the plastic often, if not daily, and check. Look for this: When you spray, is the water absorbed quickly? (good - surface moisture is present) - or does the water bead-up on the surface? (Oh-oh, the surface has dried out!) After about two, maybe three weeks following germination germination, you can partly uncover (fold some of the plastic back, or remove the rubber band, or cut a small hole with a scissors), for the next four weeks, After about two months, sometimes longer if the seedlings are smaller than 3/16 in (2.5 mm), remove plastic completely. Spritz daily before work when uncovered. Young seedlings like to be moist - conditions that would kill mature plants. |
FERTILIZING SEEDLINGS:You can use very dilute fertilizer in your spray bottle if you really insist, but it isn't necessary - just don't over do it. If you do fertilize, use a soluible fertilizer that has no urea, and the nitrogen should be half that of the phosphorus. (Low NPK ratio - look on the box. Something like tomato bloom booster at about 1/8 to a scant 1/4 tsp per gallon of water will be the most you could possibly want.) But before you fertilize more than once, think about just what this tiny plant is going to do with accumulated fertilizer, a plant that only grows two leaves a year, and in a potting mix that will never get flushed out until you repot many years from now. |
WHAT TO WATCH OUT FOR WITH SEEDLINGS:Please remember these few things:
Sow seeds after the hot days of summer have passed. Fall sowing will give them the most time to grow and reach a sustainable size before they go dormant in the heat of summer. Keep the temperature moderate, maybe 78 F (25.6 C) maximum if you can. If too hot, Lithops will either: not germinate, dry out and die, or go dormant and shrivel up. Keep them above 50 F (10 C) because that's comfortably above their zero-growth temperature (low temperature where they just stop growing). Give seedlings low to moderate light. Do not use a South facing window - but a North window is fine. If you have to, tape a piece of white tissue paper (or even copier paper if you live in a high light part of the world) to the window to block 70% of the light; if you have a greenhouse, use 70% shade cloth for seedlings. Watch out for high light levels because tiny seedlings have not synthesized protective pigments nor made light reflecting cell layers, and their chlorophyll can bleach out irreversibly. Of course, once the chloroplasts are destroyed, the plant cannot make more, and they will die as they slowly use up their resources. For newly planted seedlings, too wet is better than too dry - but that's true only for seedlings!. Spray often - the moisture in the top layer of soil - the upper one inch - is what counts. |
ENVIRONMENTAL EFFECTS:Environment? - Surrounding? - Plant location and placement? Well, very important, as this defines, in part, the growing conditions, but even this is a subjective matter. There are many environmental conditions that can influence the rate of seedling growth and maturation into adult plants. The variables, their effects and important considerations are:
Lithops like it cool - that is unless they are seedlings. When just sown, they prefer a warm - not hot - climate. A desirable temperature range is 60 to 78 F. Of course you can go higher or lower, but you will see that their enzymatic makeup changes with temperature, controlling their appearance and growth rate substantially. At 80 F, the growth rate slows because they are genetically programmed to go dormant in hot weather. For that reason, it is inadvisable to use electric heating mats, bench heaters or warmers with Lithops and Conophytums, and most other Mesembs as well - that is unless you can control the temperature yourself, and benefit from the extra trouble or expense. Winter heated greenhouses can also be a source of trouble if a heat source is locally directed onto or underneath seedling pots. Do not even think of putting your seedlings on a radiator to keep them warm! Heat can have several sources, and it is important to take in to account the thermal input of sunlight. In an otherwise controlled temperature greenhouse or windowsill, young seedling can locally overheat in their covered containers soon after planting. Even if the container is uncovered, the direct sunlight contributes greatly to the local temperature increase in the plants epiderm. Most commonly grown Lithops are highly pigmented, and therefore do not reflect large amount of radiated light, resulting in the absorbtion of most of the incident light and its conversion to heat. So when we want the seedling or timy plant to be 78 F maximum, we need to remember the heating from light. Springtime can be a seasonal challenge since the incident light is often unshaded because of lack of tree follage abound the home or greenhouse. But, you can always tack up a curtain inside the glass on your window, or rig internal or external shading for a greenhouse. Greenhouses should be equipped with shadecloth - 40% shade for northern US locations (NY, NJ), and 60% for the southern states (FL, TX, CA). |
PREDISPOSITIONAL EFFECTS:Now, how about the things out of your control? Some considerations are:
There is great variation is seed size between what are called the Lithops 'species'. Nevertheless, within a given seed sampling of a particular cultivar from any supplier, you may see seeds of greatly varying sizes. yes, the largest seeds do generally give rise to initially larger seedlings, but this advantage fades away after about a year. Good mother plant cultural conditions, health and a good growing year definately contribute to improved seed size. Seed from a population that has not been culled, selected, or hybridized for specific traits, often has some runt seedlings - exceptionally slow growing or stunted plants - which should be pulled out and tossed away. Most, if not all of the yellow genetic mutation cultivars are slower than their non-yellow cohorts, and the metabolic reason for this will be discussed elsewhere on this site. There is a good deal of technique, know-how and skill required to separate the seeds without damage to their seed coats, dry them to avoid mold growth, package without damage, and store them to maintain and ensure viability. The answer to all of this is to buy your seeds from a reputable and reliable seed source. |
WHAT SEEDLINGS LOOK LIKE:Often, the seedlings emerge over the course of several days to a week. For those watching, emergent growth happens both day and night, but the rate increases during the mid to later part of the day since the temperature is usually warmer then. However, elongated growth can happen with these higher temperatures, increasing the risk of toppeling over. I always plan ahead on sowing times to avoid overheating conditions. |

grown from Mesa Garden seed number MG1671.92 planted on 10/29/07 and photographed 11/18/07. (19 days) These tiny seedlings look very much like Conophytums at this stage, with barrel instead of the usual cone shape. Look closely to see them pushing the sand grains out of their way. |

grown from seed obtained from Mesa Garden, seed number MG1671.41 planted on 10/08/07 and photographed 10/28/07. (20 days) Compare the growth rate to L. leslei Albinica, last on this page. |

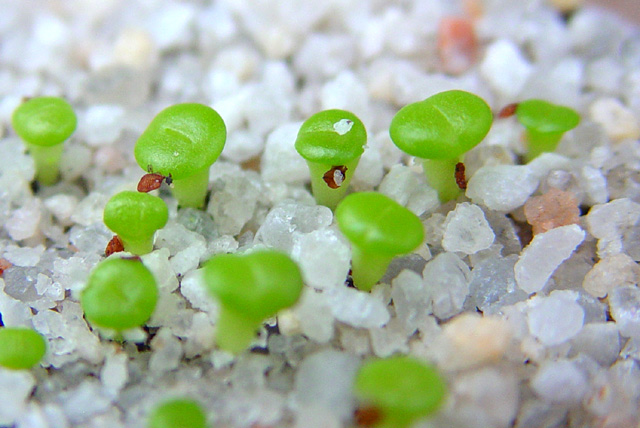
grown from Mesa Garden seed number MG1616.3 planted on 10/08/07, photographed 10/28/07 (20 days). Tiny seedlings show their characteristic trumpet shape. If not planted among very coarse sand grains, they sometimes will fall over because they produce one elongating root that can push it out of the soil. Anchoring root hairs, as on L. aucampiae, are not produced until much later on. You can see an empty hull on the edge of the seedling at the right. |
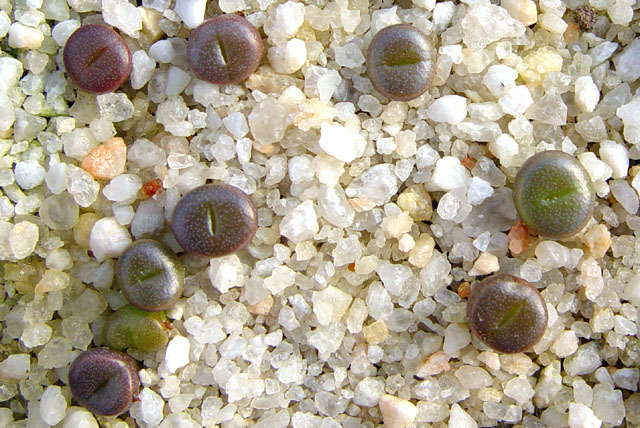
still with their seed casings. Mesa Garden seed planted 10/20/07, photographed 11/10/07. (21 days) Compare this shape to L. hookeri ssp. dabneri C13 above: L. leslei has a puffy padded seat cushion top and heavy rounded margin. Compare the growth rate to L. meyeri, above. |
FAST GROWING LITHOPS & SUGGESTIONS TO TRY:Fast growing? - Well, sort of, but that is completely a subjective matter. There are many environmental conditions that can influence the rate of seedling growth and maturation into adult plants, but we talked about this in the previous topic. |

Grown from seed obtained from Mesa Garden, MG1542. Planted 12/14/08, photographed 01/19/09 (36 days) and 02/16/09 (64 days - 0.281 in or 7.14 mm). Some cultivars or collection numbers stand out from all the rest on growth rate. This is C2 (Cole number), but other C2 seed sources may not be as speedy as these Mesa Garden seeds. |
|
I have a few suggestions to try:
But, for color, patterns, changing mood and other surprises, please visit Strangeplants >> Photo Galleries >> Lithops Seedlings to see Lithops seedlings in various stages of maturity. You can get there by clicking here |
SEEDLING SPECIES SPECIFIC NOTES:Several species are are somewhat sensitive to over-watering as they approach mature plants. They should be kept drier than usual starting about six months of age:
Some species require higher light than most others, and just will not grow well without it, but seedlings must always avoid direct sun. You can use L. optica var rubra as a light intensity indicator - if they're not deeply and uniformly colored, then there is insufficient light.
|
SEED SOURCES ~ LITHOPS & OTHER MESEMBS:
|